My guess is that you've got all the components of your LED or Neon interior car lights in front of you and you're now a bit confused as to what you should be doing next... am i right? And now you're asking yourself - "where the heck do all these bits go?" Then fear not, save the gray hairs for a later date, cause you just landed on the right page to help you find out all the "whys" & "Hows" of this type of installation - which i should mention, has been designed with the "Novice" in mind.
Our team of dedicated Market & Product Researchers from All-Neon-Car-Lights.com, have spent an enormous amount of time & money installing interior car lights and under car kits from a variety of manufacturers onto our test vehicles, and as a result after all this testing, we can now provide you with these "Basic Generic Instructions" (suitable for all makes & models) on how to install interior led lights & neon lights on your vehicle.
PLEASE READ THROUGH THE NEXT FEW PARAGRAPHS FROM START-TO-FINISH VERY CAREFULLY BEFORE PROCEEDING WITH THE INSTALLATION
The instruction page below is broken-up into TWO PARTS. Each part focuses on a separate way of accessing the 12v power for your interior or exterior car lighting accessories.
Part 1)
The First place that you would naturally get power from, is DIRECTLY from the car battery. This set-up is the Number 1, HIGHLY RECOMMENDED, and EASIEST method of all.
Part 2)
The second place to get power for your LED's and Neons would be from a live 12v wire located under the dash area. This method we *DO NOT RECOMMEND* and the installation is somewhat more complicated. However, we have many customers requesting how to install interior car lights when the ignition is turned on, so we decided to help you with this type of set-up anyway.
Your most likely wondering, why is power from under the dash NOT a good idea? Well basically, it can cause car wires to overheat and burn out, should you happen to wire up your lights the wrong way, or "tap" into the wrong wire to access power, which happens too often. But we figured, if there are people out there that want their power from under the dash, so their lights come on when the ignition is turned on, then we may as well show you how to install neon lights in your car the correct way, but it is labeled, "ENTER AT OWN RISK".
WARNING: Please keep in mind that the main issue we face with having neon or LED car lights on our vehicles these days is the fact that they are often frowned upon by the authorities. So to avoid any uninvited fines, and to have total control at your fingertips, its best to install neon or LED lights so as they can be activated through a separate Expandable Control Switch for ease of use, rather than having them come on when the headlights are turned on. If you do have your neons come on when the ignition is turned on, your best bet is to have a kill switch installed to get you out of trouble, should the police be on the prowl, or if there is some "overheating" going on.
Another Word of Caution on how to install interior car lights, BE WARNED, if you do obtain a 12V power supply for your LED/Neons from one of the wires under the dash, be sure that it's not the headlight wires, because you cannot turn the neons or LED's off while driving at night, (unless you have an in-line switch) and be twice as sure that the wire your tapping into has 12volts of power running through it by using a voltage meter and circuit tester, and be tripply sure to install a fuse on the power wire going to your LED/Neons.
But it is still highly advised to access your power supply from the car battery and NOT from under the dash. However, if this type installation is done correctly, you should have no problems, it's been done many times before without any drama, but we'll leave the "risk-taking" up to you, we'll just supply the guide, but it is by NO MEANS meant to be taken as a solid "blue-print", because cars, people and situations differ.
Remember also, with some later model cars and messing around with wires under the dash board could accidentally activate the air bags, so don't say we did'nt warn you!
Ok, now that we have those two points cleared up, if you would like to install your light kits by accessing power from the car battery, please Click Here to go to those instructions now.
If you would like to access power from a 12v wire under the dash that is active when the ignition is turned on, which we DO NOT recommend, then please Click Here to go to those instructions now.
The tools your going to need to do this installation. You'll need...
A toggle switch (to control tubes independently)
Soldering gun and solder
Electrical tap or heat shrink tubing
Silicone
Flat head screw driver
Star head screw driver (should you need to remove any interior panels)
And any other tools that are mentioned in the instructions that come with the led/neon kit that you have purchased.
These instructions have been designed with the "Novice" in mind, so if thats you, then please read-on carfully - its really not that hard.
How to Install Interior Car Lights via the car battery - Step 2
As a rule, before doing *Any* electrical work on your vehicle, always disconnect the battery before starting (be aware that in later model cars, disconnecting the battery can disrupt the cars electronic systems). Do this by disconnecting the negative battery cable and laying it to one side so its not touching any metel parts. It's also wise to have your vehicles service manual handy for information about the specifics of the electrical system on your vehicle should you need it, but you should not.
Ok, lets get started. In this installation we'll be showing you how to install interior car lights using ONE neon tube as an example. What you'll need to do first is find where you want to mount the tube and keep its location in mind while doing the wiring part of the installation, so you can allow for the correct lengths of the wires.
For the interior, the best place to mount the tube is under the dash just above where the feet go, but high enough so as not to kick the tube or damage it. They also look very effective mounted under the front seats and towards the "back area" of the seats so the light shines into the rear part of the car floor.
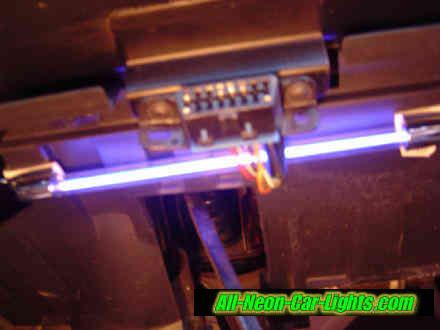
The picture below shows the neon tube mounted under the drivers side dash.
How to Install Interior Car Lights via the car battery - Step 3
In this set-up, you'll be running both the main power wire (with in-line fuse attached) and earth wire from your light kits directly to the car battery. This Method is HIGHLY recommended for one or two car lighting accessories, and is the easiest way to do it, but after two or more light kits are installed this way, your car wiring system coming from the battery will start getting real messy. So to install many accessories via the car battery, you going to need some kind of fuse protected distribution control panel that all your lights will plug into, and that you have easy access to. This is the coolest, easiest and "most-hassle-free-way" of hooking up and controlling multiple lights.
Such a distribution control panel that you can plug all your lights into is now available, the LED Distribution Control Panel
Ok, moving on...
How to wire a toggle switch
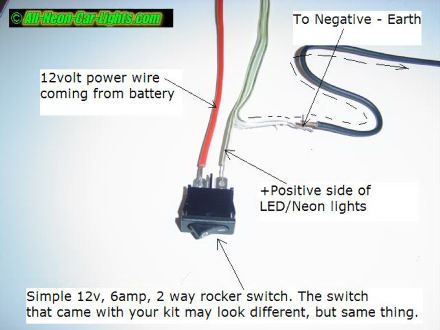
To operate your lights manually, your going to need a switch located near you, so, you'll need to buy a simple "2way toggle" switch (or use the switch that may have came with your neon/led tube kit) from your nearest auto accessories store. This switch will be inserted into (in-line with) the main power wire that supplies the kit with 12Volt power.
You simply cut this power wire for the kit (making sure you have positioned "ALL" components in their locations and are sure the wires are long enough) and then join each end of the power wires you just cut into each side of the toggle switch. As shown below. This will allow you to switch the tube on & off independently from a direct power source. You can mount this switch in any "easy-to-get-to" location on your dash if you wish.
see picture below of the example switch "in-line" with the neon tube's power supply...
How to Install Interior Car Lights via the car battery - Step 4
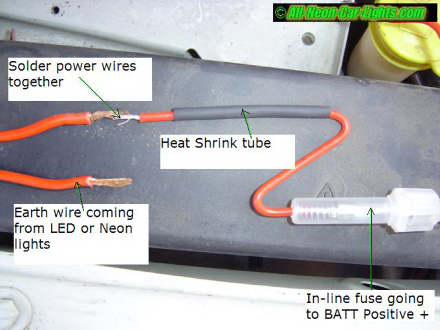
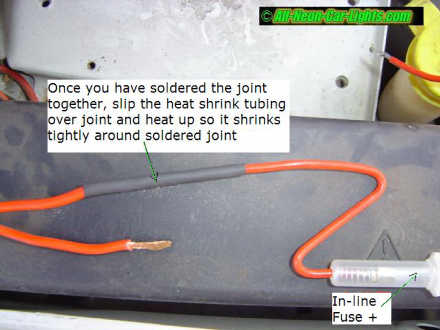
Now that you have joined the switch into the power wire of the light kit, you'll now need to run a "fuse-protected" power wire from the battery going to the switch. The fuse should be no more then 18 inches away from the positive terminal on the battery. You may need to solder the fuse to the power wire for your lights, or the fuse may have already come complete in the kit, however, if you need to solder any wires together, be sure to use heat shrink to cover your soldered connection (put heat shrink on first BEFORE you solder wires together). Once you have soldered the wires together, then "smear" a small amount of silicone over the joint, then slid your heat shrink over the joint and "heat-up" with a cigarette lighter untill the heat shrink tubing "shrinks tight" around the soldered joint.
You can see this "fuse-protected" power wire below...
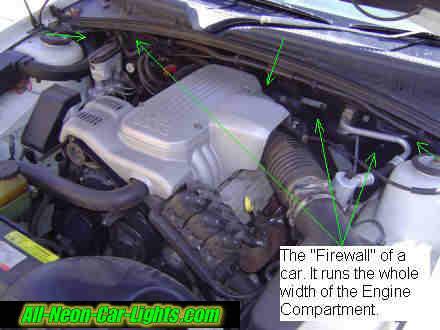
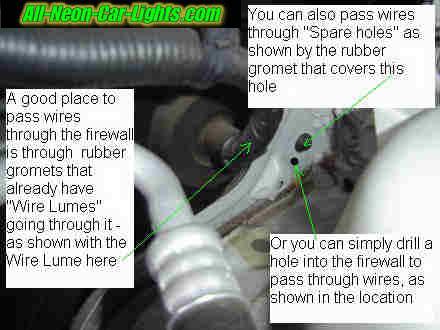
You will need to run this power wire through one of the "existing holes" in the firewall of your car to reach the battery. This is the wall that separates the interior of the car from the engine compartment. If you do go drilling holes in the firewall to pass through wires, be sure to insert a rubber grommet to prevent the metal rubbing the wires bare.
Important: For any vehicle project that involves drilling holes into the body, its a good thing to first check where you're going to drill the holes to be certain you won't pierce or damage any crucial parts such as brake lines, fuel lines and electrical lines, etc, that would be a real shame!
Open the hood of the car to find these "existing holes" and also look from inside your car by positioning your head anywhere under the dash so you can "clearly" see where exactly the existing wires are going, what holes are available and how they go through the firewall into the engine compartment.
How to Install Interior Car Lights via the car battery - Step 5
To complete the "electrical circuit" - you'll now just need to attach the earth wire from your led/neon tubes to the negative ground earth of the chassis. You can do this in TWO WAYS...
1) Attach it anywhere where there is bare steel under the dash is always a good earth connection, even if you find a screw under the dash that is already screwed into bare steel that is holding another wire in place as an earth, you can use this too as an earth location. Or...
2) You can run the earth wire along the same path as the power wire going straight to the "negative" side of the car battery, this is most likely the easiest and surest way of do it.
How to Install Interior Car Lights via the car battery - Step 6
After your "power" & "earth" connections are complete, your led/neon lights should now work through the switch you installed. If they appear dull, not real bright, or flicker on & off, then be sure to check that you have made GOOD earth and POWER connections.
If by chance something stops working on your car while you are doing this installation, just check the fuses in your car, as you may have blown one. But this should not happen because you are accessing 12volts of power directly from the car battery on it's own circuit. Fuses only cost about 50cents each and you get them from car accessory stores, just show them the one you have blown, and they will have one there to replace it. Just be careful not to "short-out" or "cross" any wires, and you should be fine.
How to Install Interior Car Lights via the car battery - Step 7
That's it, your all done - now all you have to do is put any plastic panels back into place that you may have torn off, and then head out to show your friends what a great look you've just created on your car.
If these instructions all seem a little "over-whelming" - then your best bet is to print out these instructions and read them through a few times to familiarise yourself with what you need to do. Then when your ready, have these instructions with you while your installing the LED or Neon interior car lights into your car.
And if your still un-comfortable with this installation - and feel that you cannot do it, then your going to need to contact a professional who can. There are a growing number of car accessory installers that provide these kinds of services, just ring around at a few places to find out who will do this installation for you.
The tools your going to need to do this installation.
You'll need...
A curcuit tester (explained below)
A multi-meter (explained below)
A toggle switch (to control tubes independently)
A razor blade
Soldering gun and solder
Electrical tap or heat shrink tubing
Silicone
Flat head screw driver
Star head screw driver (should you need to remove interior panels)
And any other tools that are mentioned in the instructions that come with the led/neon kit that you have purchased.
These instructions have been designed with the "Novice" in mind, so if thats you, then please read-on carfully - its really not that hard.
How to Install Interior Car Lights using 12v power from under dash - Step 2
Before doing *Any* electrical work on your vehicle and as a rule of thumb, always disconnect the battery (be aware that in later model cars, disconnecting the battery can disrupt the cars electronic systems). Do this by disconnecting the negative battery cable and laying it to one side of the car battery. It's also wise to have your vehicles service manual handy for information about the specifics of the electrical system on your vehicle should you need them.
Ok, lets get started. So you want to install them permanently. What you'll need to do first is, presuming you want to install interior led/neon tubes inside your car, is find where you want to mount the tubes and keep their location in mind while doing the wiring part of the installation, so you can allow for the correct lengths of the wires.
For the interior, the best places to mount the tubes are under the dash on both sides just above where the feet go, but high enough so as not to kick the tubes or damage them. They also look very effective mounted under the front seats and towards the "back area" of the seats so as the light shines into the rear part of the car floor.
The pic below shows the neon tube mounted under the drivers side dash.
How to Install Interior Car Lights using 12v power from under dash - Step 3
Choose if you want your lights to turn on automaticaly when the headlights are turned on, or if you want to control the lights separately with a "toggle" switch.
If you want the tubes to light up automaticaly when the headlights are turned on, then you will now need to find a wire under the dash near the steering colum. This wire you are looking for is normally Red or Yellow, and its supplying the "headlight control switch" with 12V power - you're going to have to "tap" into this wire to light-up your lights when the headlights are turned on, but be sure that it has 12v by using a multi-meter as shown below. If you want your lights to come on when the ignition is turned on, then you'll need to find a 12v wire that is "active" when the ignition is switched to "on".
In this set-up, you'll be "tapping" into a main power wire from under the dash. This Method is ONLY RECOMMENDED for one or two car lighting accessories, but after two or more light kits are installed this way, your car wiring system from under the dash will start getting real messy and not to mention, hazardous. So we then suggest to install some kind of "fuse protected distribution control panel" that is accessing fuse-protected power directly from the car battery which all your lights can plug into, and that you have easy access to. This is the Coolest, safest, and "most-hassle-free-way" of hooking up and controlling multiple lights from inside your car.
Such a distribution control panel that you can plug all your lights into is now available, the LED Distribution Control Panel
Ok, moving on...
How to Install Interior Car Lights using 12v power from under dash - Step 4
You can tap into a 12V power wire from your existing car fuse box to run the lights. This is mainly what the instructions below are based on. Please bare in mind though, that if you do "tap" into existing power wires on your vehicle it is recommended that you only do it once, and be sure to solder the connection and seal it properly with insulation tape to avoid any possible fires. Many people would advise against this method of tapping into existing vehicles wires, but if done properly, as explained above and below, you should not have any problems. But if you are unsure, please connect car lighting accessories DIRECTLY to the vehicles battery.
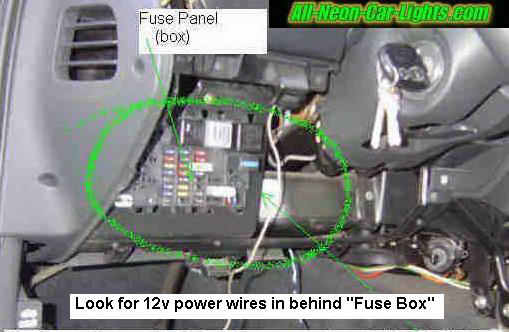
The best place to "tap into" a live 12v wire is at the rear of the car "Fuse Box". But first you'll need to get inside your car, on your back where you normaly put your feet and remove all the "plastic panels" from under and around the dash so you can expose the "rear end" of the fuse box to create working space. This may not be as necessary for some makes and models of vehicles.
Remember, with some later model cars and messing around with wires under the dash board could accidently activate the air bags.
The picture below was taken on a GM 98 model Commadore - Notice how we had to remove the air duct from behind the dash to exposed all the wires at the back of the fuse box? But not all cars are like this.
Normally, a fuse box is located under the dash on a car or truck. It could also be located under the hood, in the engine compartment. If this is the case, then you may want to "tap" into the power wire from there, or still from under the dash - its really up to you where you tap into power wires, just as long as it's a "thick Guage" 12v wire that is in an easy spot to work on, and you'll be fine.
How to Install Interior Car Lights using 12v power from under dash - Step 5
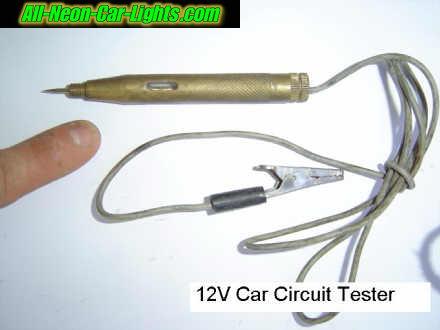
Now that you have found the wires, you'll need to buy a "Circuit Tester" from your nearest auto accessories store - they only cost about 10 dollars. To use this tester is simple, it looks like a pen with an earth wire hanging out the top of it and a clamp attached to the end of the wire, and it has a globe inside the middle of the pen, or on its end, which lights up when you have found power somewhere. The tester you buy will look similar to this discription below.
What you do is you attach the earth wire of the tester to negative ground earth on the chassis - you'll find two big nuts under the steering colum that are actually holding the steering colum in place, attach the earth wire of the tester onto one of these nuts, or any other surrounding steel of the car in this area under the dash - if any part under the dash looks like metel and seems to be part of the the cars structure, and is "bare metal" IE: NOT been painted, then this connection will give you good negative earth also.
When you've found a suitable earth, you then need to re-connect the car battery, then turn the car ignition switch to "on" then proceed to "prick" each of the wires that you see before you, using the sharp pin end of the tester - don't worry - you want do any damage by doing this, only to your finger if your not careful!
You need to firmly "pearce" each wire untill the globe on the tester your holding lights up - when it does, hold the tester on that particular wire while at the same time turning the car ignition to "off" - If the tester light goes out, then you have found a wire with power running through it - turn the ignition on and off a couple of times to be sure its the correct wire.
How to Install Interior Car Lights using 12v power from under dash - Step 6
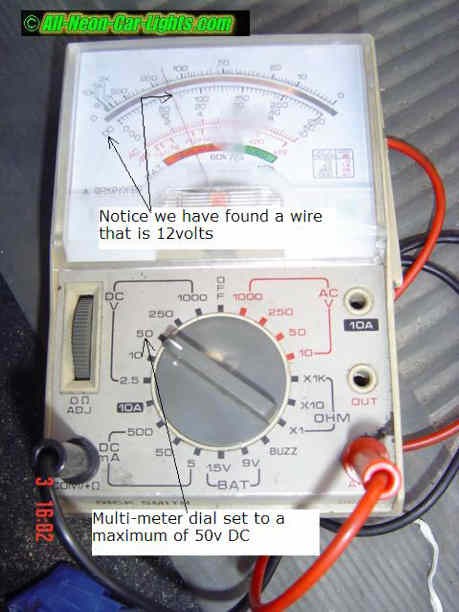
The power wire you have now found, needs to be tested to see if it has 12volts of power running through it. To do this you'll need a "mutli-meter" that is 12v DC compatible. Switch the control dial on the mutli-meter round to 12v and place the negative prong on an earth in the car and the positive prong onto the wire you think is 12v. If it is, the meter will let you know. If your happy with the selection, then this is now the wire you will be tapping into to supply your led/neon tubes with 12v power.
Just remmember though, what ever wire you tap into make sure you know what the wire is by checking the car "fuse description panel" located near the car fuse box. That way, if for example you tapped into the cigarette lighter wire and its fuse blows when you operate the lights, you will know what fuse to replace, (but the neons or led's should not draw too many amps to blow this fuse) and you will also know that it is NOT a good location to run your lights from. If this happens, try tapping into a 12v wire that is "linked" to a higher amp fuse in the cars fuse box.
How to Install Interior Car Lights using 12v power from under dash - Step 7
Now that you know what wire to tap into, turn the ignition off, dis-connect the battery and strip the plastic off from around the wire you chose using a razor blade in the spot where you want to tap into it. Strip off about 1/2 inch of the plastic from around the wire, until there's no more plastic on the wire in that spot.
Then firmly wrap the main power wire (with in-line fuse attached) going to your tubes around this wire, the one you just removed the plastic from - and solder it in place for a good connection.
Once you have soldered the joint, "smear" a small amount of silicon onto the joint to prevent corrosion, then proceed to "tape" the connection up with electrical tape so as it doe's not come in contact with other wires, which could cause a spark or fire.
How to Install Interior Car Lights using 12v power from under dash - Step 8
To operate your lights manually, your going to need a Stylish Control switch located near you, (or use the switch that may have came with your neon/led tube kit). This switch will be inserted into (in-line with) the main power wire that supplies the kit with 12Volt power, as shown below.
While making sure you have positioned "ALL" components in their locations and that the wires are long enough, join each end of the power wires to each side of the toggle switch. As shown above. Mount the switch in an easy to reach location on your dash if you wish. This will allow you to control the tubes independently from a direct power source.
How to Install Interior Car Lights using 12v power from under dash - Step 9
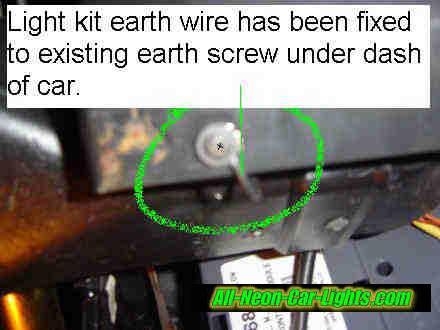
To complete the "electrical circuit" - you'll now just need to attach the earth wire from your led/neon tubes to the negative ground earth on the chassis. You can do this in the same way as described above for the earth wire on the circuit tester or anywhere where there is bare steel under the dash is always a good earth connection, even if you find a screw under the dash that is screwed into bare steel and it is holding another wire in place as an earth, you can use this too as an earth location.
How to Install Interior Car Lights using 12v power from under dash - Step 10
After your "power" & "earth" connections are complete, your led/neon lights should now work. If they appear dull and not real bright, then be sure to check that you have made GOOD earth and POWER connections.
If by chance something stops working on your car while you are doing this installation, just check the fuses in your car, as you may have blown one. Fuses only cost about 50cents each and you get them from car accessory stores, just show them the one you have blown, and they will have one there to replace it. Just be careful not to "short-out" or "cross" any wires, and you should be fine.
Thats it, your all done - now all you have to do is put any plastic panels back into place that you may have torn away, pack your tools up, and then head off to show your friends what a great look you've just created on your car - Enjoy!
If these instructions all seem a little "over-whelming" - then your best bet is to print out these instructions and read them through a few times to familiarise yourself with what you need to do. Then when your ready, have these instructions with you while your installing the LED or Neon interior car lights into your car.
And if your still un-comfortable with this installation - and feel that you can not do it, then your going to need to contact a professional who can. There are a growing number of car accessory installers that provide these kinds of services, just ring around at a few places to find out who will do this installation for you.
Please keep in mind that the main issue we face with having neon or LED car lights on our vehicles these days is the fact that they are often frowned upon by the authorities. So to avoid any uninvited fines, and to have total control at your fingertips, its best to install neon or LED lights so as they can be activated through a separate Switch for ease of use, rather than having them come on when the headlights are turned on. To do this, you can run a power wire directly from the car battery to the operating switch, thus by-passing the vehicles headlight switch.