 |
Moog Prodigy |
|
Moog Prodigy |
| FREE plans to add MIDI capability to the Moog Prodigy with the Synhouse MIDIJACK! |
 |
Most Moog Prodigy synthesizers have no interface whatsoever. Only
the very few last Prodigies made had CV, gate, and audio
input
jacks. The following plans describe a method of adding MIDI
capability
to the early model Moog Prodigy (without CV/gate jacks) with the
Synhouse
Original MIDIJACK. You can do this yourself if you have a little
experience
with electronic repair and the soldering of wires and circuit
boards. It is best to download these notes and
diagrams
and print them out on paper to look at while working on the instrument
and make notes and check off the steps as you go. As with any
project, it is best to completely read and understand each step of the
instructions
before starting. All repairs and modifications made to your
instruments
will be done at your own risk and Synhouse Multimedia Corporation
assumes
no liability for personal injury caused or damage to equipment or loss
of use caused directly or indirectly by the use of these plans. If
in doubt, don't do it!
Brief instructions (diagrams follow at bottom of page):
1) Fully test the Moog Prodigy to be converted to MIDI. Be sure that all functions such as VCF envelope work and that the instrument plays in tune while playing along with a known well-tuned instrument such as a newer digital synthesizer or sampler keyboard.
2) Be sure the Moog Prodigy to be converted is the earlier model without CV, gate, or audio input jacks. This particular MIDIJACK installation is more complicated than most because the installer must remove the Moog circuit board, add jumpers, and cut copper traces to access the correct analog I/O signals. A newer Prodigy with CV/gate jacks is just as easy to convert to MIDI with the MIDIJACK as any other synthesizer because all connections are made at the inside terminals of the CV/gate jacks, without any surgery to the PC board. This mod reroutes the local keyboard signals through the computer-controlled analog switching matrix of the MIDIJACK by extracting the signal and inserting the users' choice of local keyboard control or MIDI.
3) Unplug the Moog Prodigy and remove all knobs and switch caps (if it still has any). Remove the screws holding the chassis together and remove the main circuit board.
4) Determine the place where the MIDIJACK circuit board will be mounted and drill four holes using the paper drilling template provided with the MIDIJACK Installation Manual. The hole over the scale adjust trimpot should be large enough so a small screwdriver can fit through the panel for periodic adjustment. One very good place to drill is at the front left edge of the main control panel nearest the pitch bend and modulation wheels. Such an installation will be nearly invisible, yet put the MIDI function button at the players' fingertips.
5) Determine the place that the MIDI input DIN jack will be mounted. The back panel is the best mounting place but be careful not to get too close to the AC power wires and fuse. Drill two holes for the screws. A large round hole must be cut for the DIN jack and the best possible tool to use is a chassis punch with a 3/8" drive ratchet after a pilot hole has been drilled in the center. If done cleanly and correctly, the Moog Prodigy will look like it had MIDI when it came from the factory.
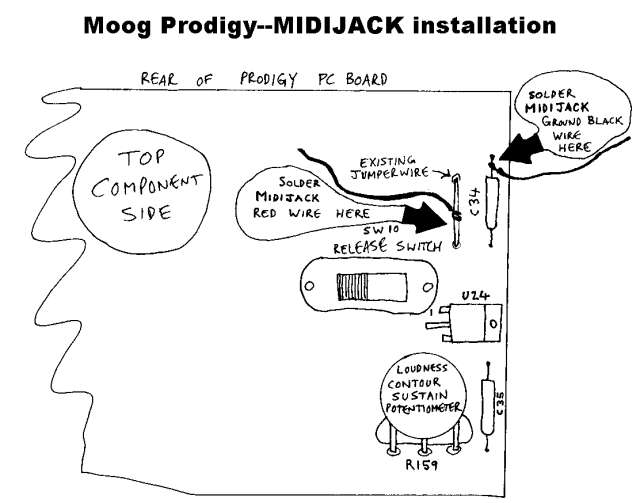
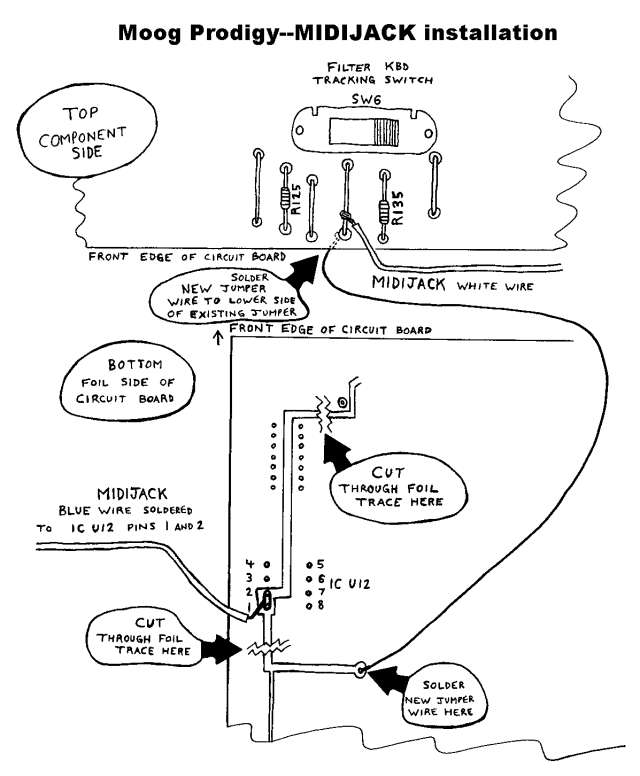
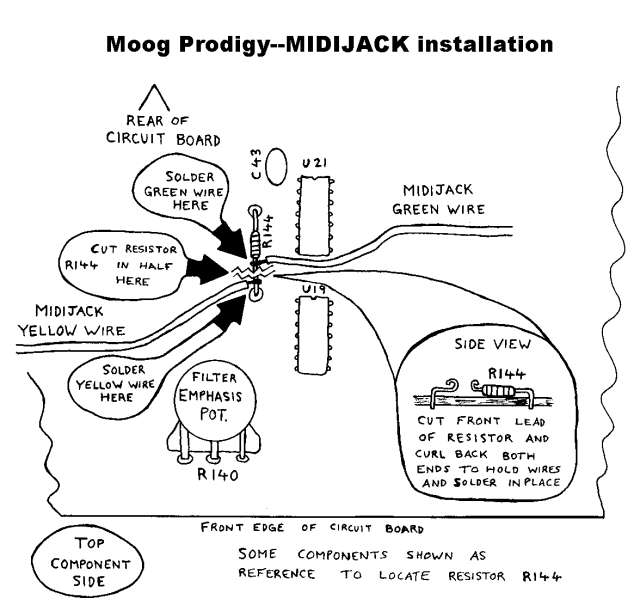
6) Solder the black and red wires in place to get the power for the MIDIJACK. Solder the blue, white, yellow, and green wires in place. See Prodigy--MIDIJACK installation diagrams provided for exact cutting and soldering points. Note that this uses the gate wires and does not use the brown S-trigger wire as most other Moog installations would. The brown wire (and the violet wire if unused) may be clipped off after a successful installation.
7) Extreme caution should be taken while working on the Moog Prodigy. The unit should be unplugged while open and even then, the power supply may pose some electric shock hazard due to residual voltage in the power supply.
8) Examine all connections and leads for possible short circuits before reassembling chassis. The Moog Prodigy was often poorly made and inspected. Some leads of resistors and capacitors were never properly trimmed at the factory and may cause a short circuit and damage some ICs due to the fact that some leads are long enough to touch other adjacent leads. Work carefully and inspect carefully.
9) This modification should take between one and two hours to complete.