In this chapter you will see how to create menus and screens in AS400.
Display files are DDS files that enable us to create AS/400 menus and screens to interact with the user. Display files can have several records. Each record defines part of the screen's appearance. These records may or may not overlap each other.
The SDA application allows us to “draw” what should show up on the screen and creates the DDS code from our “drawing”. Next we'll create a screen with DDS and afterward we'll look at some code excerpts, because sometimes it's easier to alter the screen through its code.
In this chapter we'll create a screen to show a clients data.
To open SDA type STRSDA on the system prompt. This screen should appear:

Choose option 1 and type the options as you see them on the image below. Source file is the file where the code will be stored. Member is the name of member we're creating.

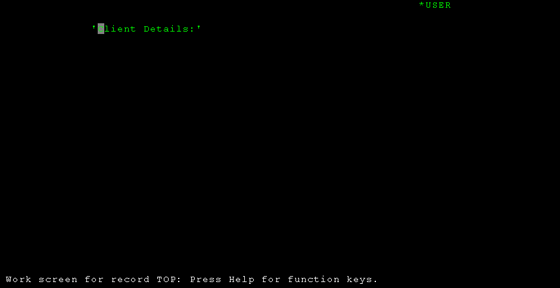
Press Enter. A new screen appears. Add a new record, named TOP, typing what you see on the image bellow.

Now specify the record type, in this case it's RECORD:

After the Enter an empty screen appears. In this screen you can “draw” the top record. Add the content you see on the image bellow.
When you type a string you should place it between apostrophes. If you don't each word will be handled like a different field. Placing the apostrophes allows you to manipulate all the words as a single field.
The *USER function shows the username on the screen. There are other functions that retrieve information from the system: *DATE (shows the system current date), *TIME(shows the system current time), *SYSNAME (shows the system name).
After typing what you see on the image press Enter. Always check what you've done before pressing Enter, because after that you can only alter the screen by manipulating its code. You can also exit the record editing without saving your work, but then you'll lose all you've done since you last opened the record for editing.
Moving a field
You can move a field to the right placing “>” characters to the right of the field. The number of > you type will be the number of columns the field will move. To move the field to the left place < signs on the left side of the field.

Centering a field
To center a field on the screen place an 'ac' at the left of the field and the 'c' must be overlapping the first character of the field. Then press Enter.
Press F3 to finish editing this record. Choose option 1 to save your work:

Create another record named BOTTOM, the same way you've created the TOP record.
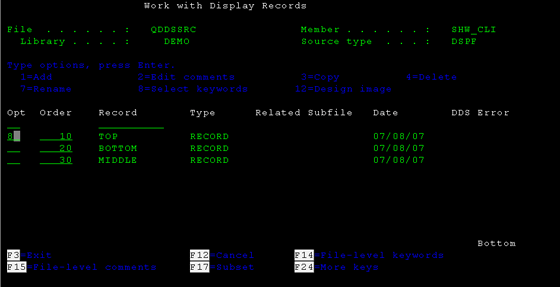
When you open the new record for editing press F9. This menu will appear:
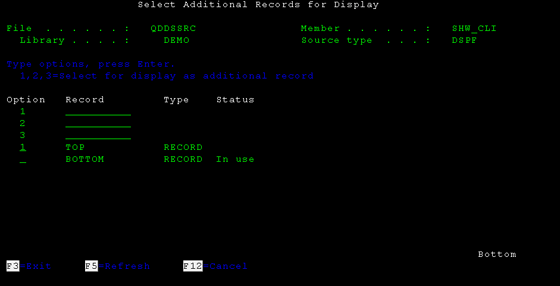
So that you don't overlap the records you can choose to visualize other records in the menu. You can see that the status of the BOTTOM record is “In Use” which means it is the one currently being edited. You can select at most 3 records to visualize. To do so place numbers 1 to 3 on the records you want. Select the TOP record and press Enter.
The names of the selected fields appear on the bottom of the screen. Don't forget you are only “drawing” on the record in use. The other records only help you place your elements on the right place.
“Draw” something similar to what you see in the next image. Use the underscore to make the line.

Changing field proprieties
We're going to edit the proprieties of the “F3=Exit” field. Place an '*' at the left of the field and press Enter:

This screen appears. Place an 'Y' in the Colors option. We're going to change the color of the characters.

Place an 1 in the Blue field:

Press Enter until you're back in the editing screen. The field is now blue. Exit the editing screen (F3) and save your work.
Create a new record, MIDDLE, the same way you've created the previous records.
Press F9 to visualize the records you already created:

Draw what you can see in the following image. Press Enter when you're done.

Using table records
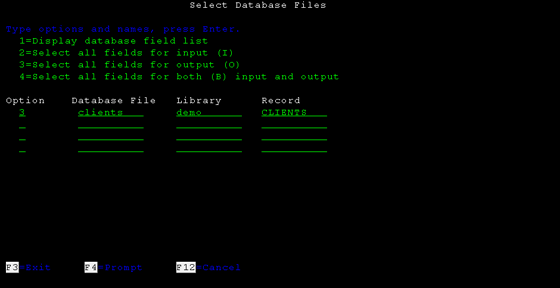
We're going to select the fields from the Clients table to show them on the screen. Press F10. On that menu select the Database File Clients for output (option 3). You can also select fields for input or input/output choosing one of the other options. You should write this on the menu and press Enter:
On the bottom of the screen there's a message with all the Client's field names preceded by a number. To use a field on the screen you should write its correspondent number preceded with an '&'. You can see it in the next image. Be careful, because if you write a number and press Enter the order of the list on the bottom will change.

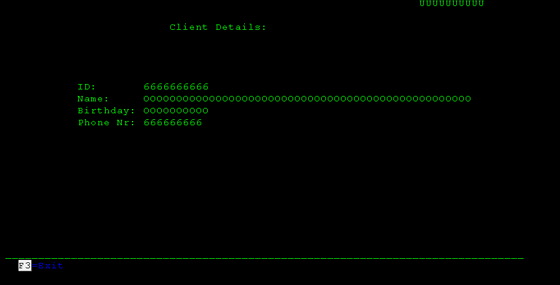
The final result:
Exit the record editing. We now need to make a few adjustments to the file options.
Record level options (overlay)
Choose option 8 to the TOP record:
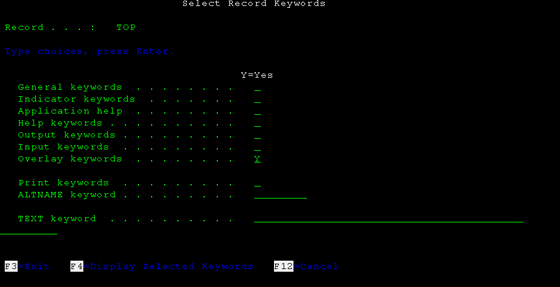
Select option Overlay Keywords:
Place an Y at the option Overlay without erasing. This option allows to display this record on the screen together with the others. Press Enter until you reach the menu with the record listing. Activate this option on the other records.

File level options (indicadores)
We need to declare the indicator 03 (so that “F3=Exit” works) at the file level. On the menu with the record listing press F14 (F13=shift+F1; F14=shift+F2; F15=shift+F3, etc.). On the following screen choose the option Indicator Keywords.

Insert the data you see on the image below:

Press Enter until you've reached the starting menu. Press F3 and save the file.
Display Files DDS code
You can check out the code from this display at QDDSSRC, the member is SHW_CLI. At the beginning of the file should be something like this:
A DSPSIZ(24 80 *DS3)
A CF03(03 'Exit')
These are the file-level options. You should add a line to this area that later will allow you to rename the indicators used. Add this line after the DSPSIZ line:
A INDARAYou should also have some lines like these:
A R TOP
A OVERLAY
A 1 65USER
A 3 27'Client Details:'
In these four lines are the definitions to the TOP record. Notice the OVERLAY option we had defined in SDA. The keyword USER is placed on the 1st line, column 65.
Look at this line from MIDDLE record:
A ID_CLI R O 8 23REFFLD(CLIENTS/ID_CLI DEMO/CLIENTS)Here you have a reference to the ID_CLI field on the CLIENTS table and this reference is positioned at line 8 column 23, an can only be accessed for reading (O).
Compile the file (option 14) after you've closed the member.
Executing display files
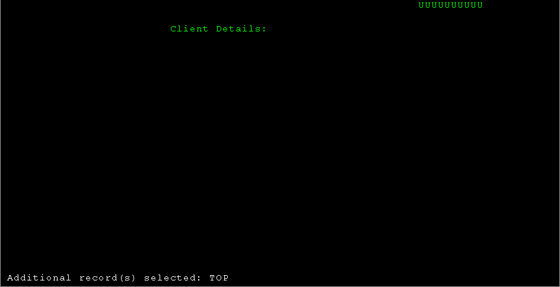
To run the screen you must create an RPGLE member which will handle all the possible events (pressing F3 for example). Check out the file QRPGLESRC.SHW_CLI to see how this member should be defined. Create a file like QRPGLESRC.SHW_CLI and run it. The result should be something like this:

If you press Enter:
